
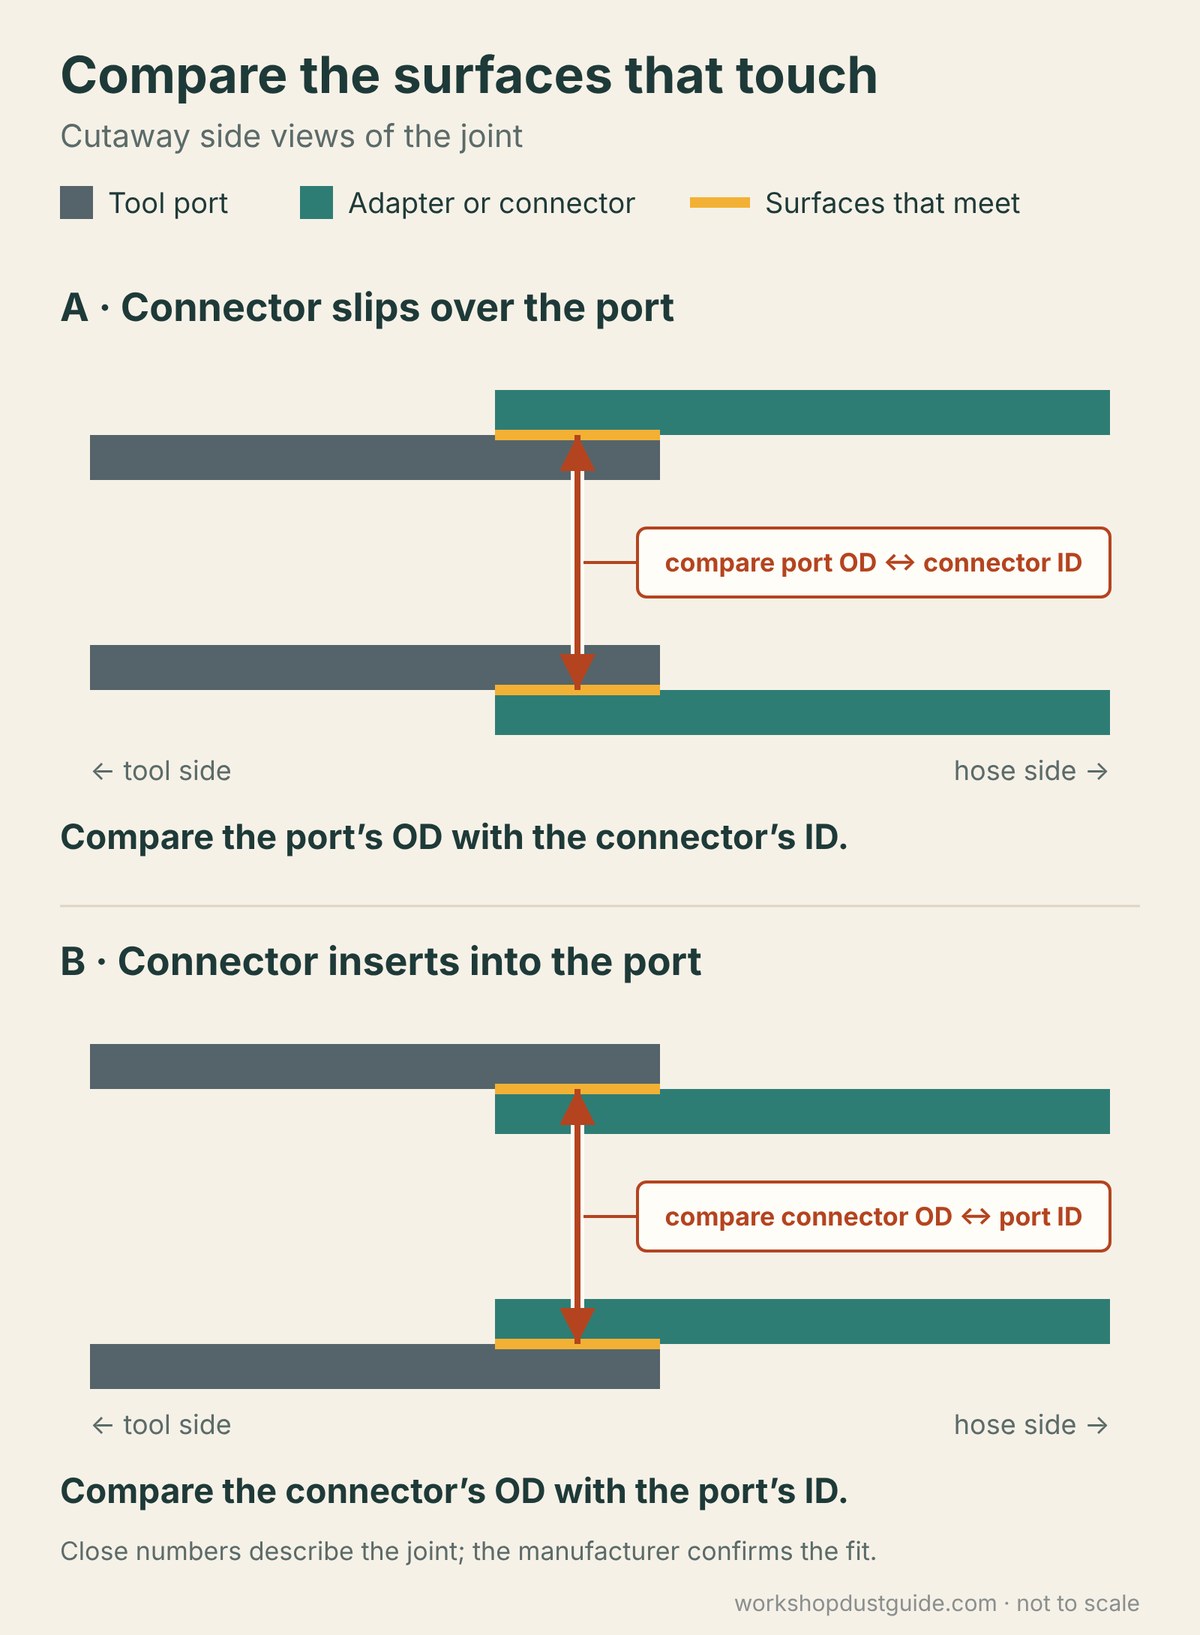
Measure the surfaces that will actually meet. For a connector that slips over a tool port, compare the port’s outside diameter (OD) with the connector’s inside diameter (ID). For a connector that inserts into the port, compare the connector’s OD with the port’s ID. Then check the connection design and the manufacturer’s compatibility information.
A size printed on a hose or adapter is not enough to describe both of its surfaces. This guide shows what to record before ordering a fitting. It is based on published instructions and specifications, not a hands-on product test.
First, identify the connection
Write down the exact tool, hose, and collection equipment models. Check the tool manual before handling or adjusting a dust port, and follow its instructions for making the equipment safe. Do not measure moving machinery.
Decide which part is intended to go inside the other. Rockler’s measuring guide recommends checking both ID and OD on ports and hose connectors. Keep those dimensions separate in your notes.
For a locking, threaded, or proprietary connector, also record the connection name and part number. Diameter is only one part of the description. A supplier needs to know whether you are matching a plain round surface or a particular connection system.
Measure the outside diameter
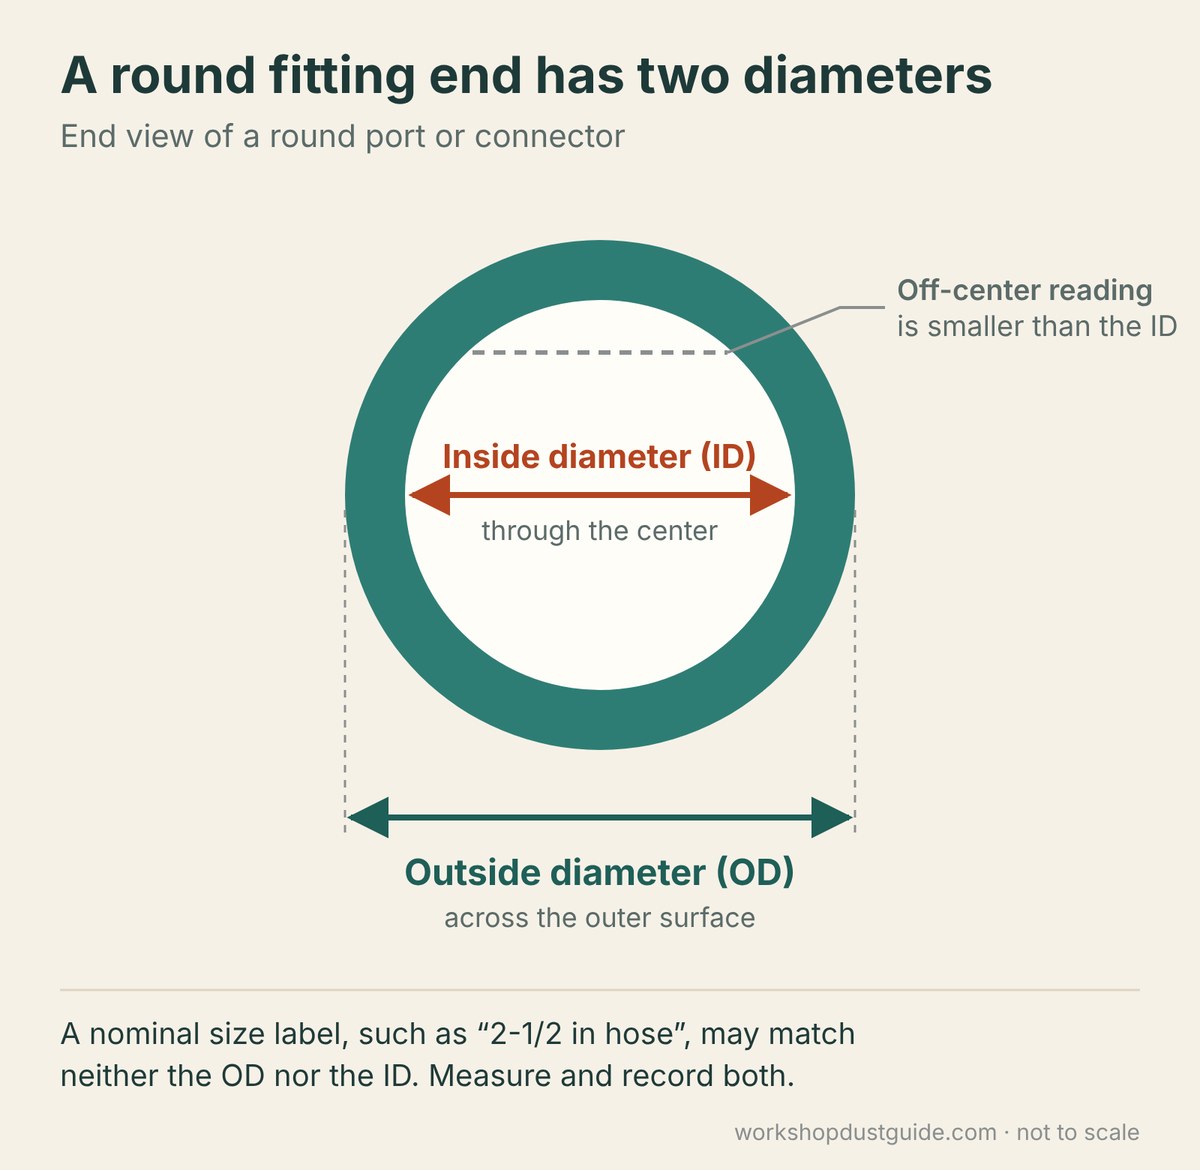
Use the outside measuring jaws of a suitable caliper across the outside of the port or fitting. Keep the measuring faces square to the part rather than tilted. Apply appropriate, consistent measuring force; squeezing a flexible component can change the reading.
Before measuring, clean the caliper’s measuring faces and check its zero according to its instructions. Mitutoyo’s caliper guide covers appropriate measuring force, inside measurement, cleaning, and checking the zero before use.
Measure the inside diameter
Use the inside measuring jaws against the inner walls of the opening. The measurement should pass through the center of a round cross-section. Mitutoyo explains that a reading taken off-center is smaller than the true diameter.
Record the units with the result. If the part is tapered, stepped, or has a lip, note where you measured and photograph that position. Ask the supplier which reference surface its published dimension describes before treating a single reading as the fit dimension.
No caliper? Estimate the outside diameter
For a smooth, rigid, round section, wrap a narrow strip of paper squarely around the outside without overlapping a lip or ridge. Mark where the strip meets its starting edge, lay it flat, and measure that length with a ruler. This is the outside circumference. Divide it by π (about 3.1416) to estimate the OD: diameter = circumference ÷ π.
For example, a hypothetical circumference of 180 mm gives an estimated OD of about 57.3 mm. This calculation follows the circle relationship explained by NASA; it is not a measurement of a particular product. Treat a paper-strip result as a rough estimate, not a precision fit check. It does not give the ID, and ribs, taper, ovality, or a soft wall can make it misleading. Confirm the fitting dimensions with a caliper or the supplier before ordering.
Keep inches and millimeters separate
Record the original reading and its units, then add a conversion if a supplier uses the other system. NIST defines 1 inch as exactly 25.4 mm: multiply inches by 25.4, or divide millimeters by 25.4. For example, 1-1/4 inches is 31.75 mm, while 35 mm is about 1.378 inches. Those are different dimensions; do not round one into the other to claim a match. A unit conversion also does not turn a nominal product size into a measured diameter.
A published example: one adapter, four dimensions
Rockler lists these dimensions for its TA1066N adapter, sold as a 1-1/4-inch vacuum-wand to 2-1/4-inch port adapter. These are the supplier’s published specifications, not measurements taken by Workshop Dust Guide.
| Adapter end | Outside diameter | Inside diameter |
|---|---|---|
| Wide end | 2-1/4 inches | 2-1/16 inches |
| Narrow end | 1-7/16 inches | 1-1/4 inches |
Source: Rockler TA1066N product specifications, checked October 29, 2026.
Notice that the narrow end’s 1-1/4-inch dimension is its ID, while the wide end’s 2-1/4-inch dimension is its OD. Comparing two labels without identifying the mating surfaces can therefore lead to the wrong question. This example illustrates how to read dimensions; it is not a recommendation for your particular equipment.
What to send a fitting supplier
Identify: the tool model, hose or cuff part number, and the adapter you are considering.
Measure: ID and OD at both sides of the proposed joint, with units and the measurement locations.
Show: a clear photograph of each connection, including any shoulder, locking feature, or thread.
Ask: which end inserts into which component, whether those exact parts are compatible, and what securing method the manufacturer specifies.
Physical fit alone does not confirm extraction performance or filtration suitability; follow the equipment and material-specific instructions.
Keep a record for the next connection
Save the model numbers, photographs, measurements, and supplier confirmation together. That gives you a specific reference when you replace a hose or add another tool. For the broader planning checklist, see Start Here: Plan Your Dust Collection Connections.
Spotted an error? Send a correction with the statement and a supporting source. Read our Editorial Policy for how we distinguish research from testing.